Have ever wanted to build a kite? Well, here is a simple kite you can make your self!A kite consists of these basic parts: The Spine. The up-and-down, or vertical stick that you build your kite around.
The Spar. The support stick(s), that are placed crossways or at a slant over the spine. Sometimes they are curved or bowed.
The Frame. The joined spine and spars, usually with a string connecting their ends, that form the shape of the kite and make a support for the cover.
The Cover. The paper, plastic, or cloth, that cover the frame to make a kite.
The Bridle. One or more strings attached to the spine or spars, which help control the kite in the air.
The Flying Line. The string running from the kites’ bridle, where you hold to fly the kite.
The Tail. A long strip of paper or plastic of ribbon that helps to balance the kite in flight. Not all kites need tails.
The Reel. The object you use to wind your flying line, to keep it form getting tangled or flying away.
How To Make A Diamond KiteMaterials:
- butcher cord or thin garden twine
- scotch tape or glue
- 1 sheet of strong paper (102cm x 102cm)
- 2 strong, straight wooden sticks of bamboo or wooden doweling 90cm and 102cm
- markers, paint or crayons to decorate you kite.

1. Make a cross with the two sticks, with the shorter stick placed horizontally across the longer stick. Make sure that both sides of the cross piece is equal in width.
2. Tie the two sticks together with the string in such a way as to make sure that they are at right angles to each other. A good way to ensure that the joint is strong to put a dab of glue to stick it in place.
3. Cut a notch at each end of both sticks. Make it deep enough for the type of string you are using to fit in to. Cut a piece of string long enough to stretch all around the kite frame. Make a loop in the top notch and fasten it by wrapping the string around the stick. Stretch the string through the notch at one end of the cross-piece, and make another loop at the bottom. Stretch the string through the notch at one end of the loop at the bottom. Stretch the string through the notch at the other end of the cross-piece. Finish by wrapping the string a few times around the top of the stick and cutting off what you don't need. This string frame must be taut, but not so tight as to warp the sticks.
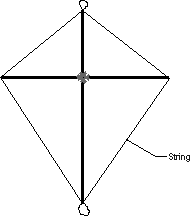
4. Lay the sail material flat and place the stick frame face down on top. Cut around it, leaving about 2-3cm for a margin. Fold these edges over the string frame and tape or glue it down so that the material is tight.

5. Cut a piece of string about 122 cm long. and tie one end to the loop at the other end of the string to the loop at the bottom. Tie another small loop in the string just above the intersection of the two cross pieces. This will be the kite's bridle, the string to which the flying line is attached.
6. Make a tail by tying a small ribbon roughly every 10cm along the length of string. Attach the tail to the loop at the bottom of the kite.
7. Decorate!
Tips:- A properly located pivot point is generally located slightly ahead of the centre of gravity.
- Cut away from you!
- Spray can glue is really good for patching up paper kites.
- Stability is improved by the use of an effective bow and a flexible tail.
- Hold your kite up by the string when you are finished to see if it is balanced. You can balance it by putting more paper on one side.
- Kites are different each time you make one, so slight adjustments might need to be made for each kite.
Source: www.skratch-pad.com
You can make a Diamond Kite self or simple buy it:
Visite the blog
How to make a kite in a week!