Showing posts with label how to make a kite. Show all posts

Monday

How To Make A Sled Kite

You need about 1 hour to make your own Sled Kite

You need next materials:
Wind: Light to Moderate (4mph to 18mph)
Line: Crochet or button hole thread
Sail: 24" x 30" plastic trash bag (kitchen size)
Spars: 16" x 1/8" wooden dowels (OR: use match-stick bamboo)
Bridle: 48" flying line
Tail: Optional. Use bag scraps.
Tape: Cellophane

How to make a sled kite:

1. Draw half of the kite on edge of plastic bag and cut out (a)
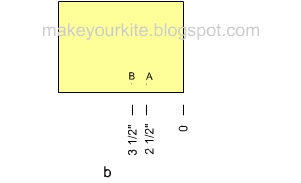
2. Tape spars to sail (b)
3. Attach 48" bridle to sail (b)
4. Find center of bridle by placing keels together and tie a loop (c)
5. Tie flying line to loop (c)
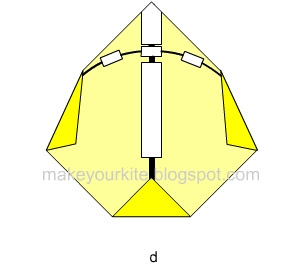
6. Optional: Roll remaining bag and cut 1-1/2" wide tails. Tape to bottom at each spar (d)

Now go at the streed and enjoy!

How to make a Sled Kite


Or you can simple buy Sled Kite:
Sled Kite Kit - Kit which makes 20 kites

Visite the blog How to make a kite in a week!

How To Make A Vietnamese Kite


Today I show how to make a Vietnamese Kite

Materials for one Vietnamese Kite:

- 12" square of covering material (see article for choices)
- Matchstick bamboo reed (selected from window blind)
- 1/2"-wide cellophane tape for Mylar or cellophane kite; or rubber cement or paste for paper version
- 22" piece of lightweight string for bridle
- Tail streamers (see story for choices)

Tools:

Scissors, pencil, ruler and nail or needle for punch

Instructions for plastic version

1 Fold and crease the kite cover as shown (pic. A). (Measurements are approximate; variations fly well)

2 Measure matchstick reed to fit the center crease from tip to folded base line. Tape this reed to the kite to form a spine, covering the reed completely. Bring bottom flap up over the reed and tape the edges down . Fold the corners of the tape to the outside nose as reinforcement (pic. B).

3 Measure a reed for the arch. Be sure this is a strong reed with a good symmetrical curve (pic. C).

4 Tape the arch reed in place at the tips and the intersection with the spine. Cover the reed with tape in 2"-3" segments (pic. D).

5 Fold side flaps over the reed and tape there down (pic. D).

6 Turn the kite over (pic. E).

7 Poke holes for the bridle close to the reed. Tie the bridle string as shown, over the intersection of the reeds and over the spine 2" up from the base of the kite. Set the bridle by tying a loop. To find the correct angle, hold the kite by its string over your table. The spine of the kite should hang nose upward horizontal at about a 15-degree angle from the horizontal (pic. E).

8 Add tails keeping them balanced on each side (Keep some extra tail on hand for when you go flying). Tail streamers can be placed according to the character of the kite(fish or fowl?), the basic rule being balance - the same for each side. The arrangement shown is four strips of crepe paper, each measuring one inch wide and four feet long. Tails could also be of colored cellophane, scrap Mylar, plastic wrap or paper, even newspaper, for the completely recycled kite. (pic. E).


Instructions for paper version

All the steps are essentially the same as for the plastic kite except that you may substitute glued paper strips for tape. (See drawings) This method will give you a more classic version of the Vietnamese kite. The side corner flaps can be glued down directly without added strips. (The easy way is to glue one side first without trying to hold the arch in place, then glue the other side)

Fly!

The Vietnamese Kite does best in light to medium winds. If your kite dives or spins on the end of the line, add more tail - and enjoy!

how to make a vietnamese kite

Don't forget about this blog how to make a kite! See you in a week!

Saturday

How To Make A Delta Kite


Today I post a sketch of One-Sheet Tissue Paper Delta Kite

You need next materials to make a kite:

- 1 20x30" sheet tissue paper
- 3 pieces match-stick bamboo (from window shade) or 1/8"-diam. dowels: 1 20" long for keel spar and 2 21" long for wing spars
- 1 20" long 1/8"-diam. dowel for spreader bar
Fringe may be glued along trailing edge.


How to make a kite:

Step 1: Cut out tissue.
Step 2: Glue 2 wings together.
Step 3: Glue on 3 spars.
Step 4: Reinforce keel with tape.
Step 5: Attach spreader bar.


how to make a delta kite

Make a Delta Kite yourself or simple buy it:


Visit my blog how to build a kite in a week!

Thursday

How To Make A Kite During 5 Minutes!


Have you no time to build a kite? Here is the simplest kite you can make your self. It takes only 5 minutes!

You need next materials to make a kite:

Wind: Light to Moderate (4mph to 18mph)
Line: Sewing thread
Sail: 8 1/2" x 11 Bond Paper
Spars: None
Bridle: Single tow point
Tail: None
Tape: Use a stapler instead of tape

How to make a kite:

1. Fold paer in half.
2. Mark points A and B.
3. Pull the two top corners to point A and staple, but do not fold flat.
4. Punch a hole at B.
5. Attach flying line.

how to make a kite during 5 minutes

Make a Kite yourself or simple buy it:


You'll see a new information about how to build a kite in a week!

How To Make A Diamond Kite

Have ever wanted to build a kite? Well, here is a simple kite you can make your self!

A kite consists of these basic parts:
The Spine. The up-and-down, or vertical stick that you build your kite around.
The Spar. The support stick(s), that are placed crossways or at a slant over the spine. Sometimes they are curved or bowed.
The Frame. The joined spine and spars, usually with a string connecting their ends, that form the shape of the kite and make a support for the cover.
The Cover. The paper, plastic, or cloth, that cover the frame to make a kite.
The Bridle. One or more strings attached to the spine or spars, which help control the kite in the air.
The Flying Line. The string running from the kites’ bridle, where you hold to fly the kite.
The Tail. A long strip of paper or plastic of ribbon that helps to balance the kite in flight. Not all kites need tails.
The Reel. The object you use to wind your flying line, to keep it form getting tangled or flying away.

How To Make A Diamond Kite

Materials:
- butcher cord or thin garden twine
- scotch tape or glue
- 1 sheet of strong paper (102cm x 102cm)
- 2 strong, straight wooden sticks of bamboo or wooden doweling 90cm and 102cm
- markers, paint or crayons to decorate you kite.

how to make a diamond kite1. Make a cross with the two sticks, with the shorter stick placed horizontally across the longer stick. Make sure that both sides of the cross piece is equal in width.

2. Tie the two sticks together with the string in such a way as to make sure that they are at right angles to each other. A good way to ensure that the joint is strong to put a dab of glue to stick it in place.

3. Cut a notch at each end of both sticks. Make it deep enough for the type of string you are using to fit in to. Cut a piece of string long enough to stretch all around the kite frame. Make a loop in the top notch and fasten it by wrapping the string around the stick. Stretch the string through the notch at one end of the cross-piece, and make another loop at the bottom. Stretch the string through the notch at one end of the loop at the bottom. Stretch the string through the notch at the other end of the cross-piece. Finish by wrapping the string a few times around the top of the stick and cutting off what you don't need. This string frame must be taut, but not so tight as to warp the sticks.
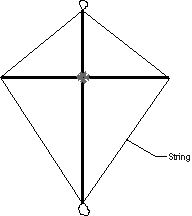
how to make a diamond kite4. Lay the sail material flat and place the stick frame face down on top. Cut around it, leaving about 2-3cm for a margin. Fold these edges over the string frame and tape or glue it down so that the material is tight.

how to make a diamond kite5. Cut a piece of string about 122 cm long. and tie one end to the loop at the other end of the string to the loop at the bottom. Tie another small loop in the string just above the intersection of the two cross pieces. This will be the kite's bridle, the string to which the flying line is attached.

6. Make a tail by tying a small ribbon roughly every 10cm along the length of string. Attach the tail to the loop at the bottom of the kite.

7. Decorate!

Tips:
- A properly located pivot point is generally located slightly ahead of the centre of gravity.
- Cut away from you!
- Spray can glue is really good for patching up paper kites.
- Stability is improved by the use of an effective bow and a flexible tail.
- Hold your kite up by the string when you are finished to see if it is balanced. You can balance it by putting more paper on one side.
- Kites are different each time you make one, so slight adjustments might need to be made for each kite.

Source: www.skratch-pad.com

You can make a Diamond Kite self or simple buy it:


Visite the blog How to make a kite in a week!